Serial Number: FS131489 (1938)

Rebuilding an
IHC F-14
Serial Number: FS131489
(1938)
|
Background This is my first tractor rebuild project. The purpose of this page is to share my experiences in the hope that others involved in similar projects might learn from my mistakes, pick up tips on sources of parts and information, and, hopefully, share their experiences and contacts with me. |
 |
 |
I was born in 1950, retired from the Navy in 1990 and have worked at a variety of jobs since. I was raised on a small farm in central Michigan and have many hours in the seats of a ’49 John Deere B and a Fifty-something McCormick Super W-6. I now live in a small village in Downeast Maine, with a few acres of land, chickens, turkeys, sheep and a 1988 John Deere 750 utility as my working tractor. You can take the boy off the farm, but …. |
| Being a farm boy, I have a fair bit of experience in "shade tree mechanics" and know my way around engines and such fairly well, although I am by no means an expert. I am fortunate enough to have a reasonable, if eclectic, assortment of hand tools, the basic air-tools, an oxy-acetylene rig and a MIG welder. Finally, I consider myself most fortunate to have a garage large enough to allow me to leave the tractor in one stall until I’m done with it. |
 |
Beginnings The Good Stuff Breaking Out the Checkbook
The manifold was obviously beyond repair, so a I ordered a reproduction unit from Don Livingston at Rusty Acre (manifold@smig.net). Don also came up with a front rim, pieces for the
clutch/transmission coupler, a couple of valve-train parts and the brake shoes. Tom Hoffman (ihc4me@ameritech.net) provided the parts necessary to replace the crank
starter. A trip to the machine shop showed that the head
was warped and needed valves, guides and seats. Considering that
it was cracked and welded, I decided to try and find a
replacement. I was fortunate to find a NOS head from Don
Livingston (see above) for less money than rebuilding my tired
unit. The NOS head was sent to the machine shop to have the
cosmoline boiled out and the valves lapped in. The news from the machine shop was no better
for the block. It’s badly cracked between the #2 and #3
sleeves and the water jacket. Although it has been nicely
repaired with pins through the webs, the sleeves must be replaced
(they’re .012 out) and the machinist didn’t think the
block would survive having the old sleeves pressed out and new
ones pressed in. The good news is that the crank is okay. Three months of posting ads on the ‘net
and making phone calls finally produced a useable block from Tim
Casson. Tim is legally blind, but loves old
tractors, and has restored several, two of which are on display
in museums. What a super guy. I have yet to make the trip to pick
up the block. With the intention of playing with the counter
man’s mind a little, I inquired at the local NAPA store
about a rebuild gasket kit for the engine. (For a 60 year old
tractor…yeah, right!) I just about passed out when he said
he could have one from Boston in two days! Further investigation
revealed that he also has sleeve kits (sleeve, seal, piston and
rings) for $88 per hole, and most of the necessary bearings!
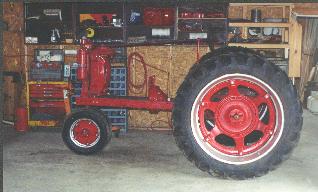
Who’da thunk it? Up To My Elbows In Grease As of March 28, 1998, I have reassembled the
frame, front bolster, hubs with new bearings, wheels with new 3
rib tires, steering, radiator, air cleaner, front and rear tank
mounts, steering wheel support and rear wheels/rims/hubs. I used
all new fasteners. Everything except the transmission tub and the
engine has been painted. Go here for
pictures. My focus here is to rebuild the tractor as a
mechanically perfect unit for light work and parade duty, not to
restore it as a museum piece. To this end, I have decided to
retain the incorrect H wheels and rims and the odd-ball cast iron
seat. I have scrutinized every picture of an F-12 or F-14 I can
lay my hands on, and am positive that this is not the original
seat. I suspect that it is from a horse-drawn implement of some
sort. Also, I used commonly available hex-head hardware of
appropriate grades during reassembly. I know the square head
hardware is correct for the period, but under the circumstances,
I didn’t feel it made enough difference to be worth the
expense. I would like to get the correct wheels on the
rear at some point, if I can find a set.
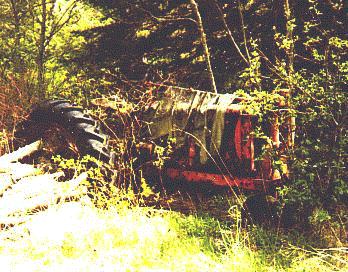
I stumbled across this tractor parked in
the weeds behind a house where I was doing some consulting. It
was in sad shape, but appeared to be complete, and reasonably
straight. The owner parted with it for $100, stating that it had
run when he parked it 5 or 6 years ago. I picked it up on May 31st
1997. After winching it onto my trailer by brute force, I
brought it home, shoved it into the garage and began the tear
down. Here’s what I found:
The Bad Stuff
Front tires in tatters and one rim rotted beyond repair
Brakes frozen, engine stuck
Top radiator casting broken at air cleaner mount, bottom casting
broken at both frame mounts Radiator cap missing
Left frame rail cracked at transmission end
No exhaust pipe, manifold rotted beyond repair
Head had been cracked and welded, block cracked at water jacket
on left side and patched
About 5 gallons of water in transmission, crankcase okay
Jury-rigged electric start, motor on right frame rail, sprocket
welded to clutch output shaft and a chain drive.
Clutch throw-out fork broken but brazed back together, throw-out
bearing in pieces
Outer brake shoes broken at pivots, oil seals leaking, drum
covers missing
Crank starting assembly missing entirely
Starting fuel tank on hood missing
Steering wheel covering (bakelite?) completely shot
Seat not original
Rear wheels/rims not original (appear to be from an H)
In spite of the water, the transmission appears to be
perfect, with no evidence of gear wear, rust, pieces-parts in the
oil or other indicators of expensive problems. Apparently, the
water didn’t get above the sump.
The rear tires have so little wear, the mold flash is still
present between the lugs. Just a little weathered.
The engine came unstuck with a breaker bar after two days of
penetrating oil in the cylinders
Virtually everything came apart with no broken bolts or resorting
to the "heat wrench". The only exception to this was
the radiator, which is understandable.
The gas tank is solid and rust-free. The hood is dinged but not
mangled.
I know my mechanical skills are not up to rebuilding the
magneto and carburetor, so off they went for a professional
overhaul. The magneto went to Jack Chandler at Magneeders (magneedr@getonthe.net) and Clyde at Berkshire Implement (219-643-3115) did
the carb for me.
In and around all the above, I disassembled the tractor
to the point that the transmission tub was sitting on jack
stands, and literally everything else was reduced to component
parts. From June ’97 to January ’98 I tackled the task
of scraping, degreasing, sandblasting, priming and painting every
part of this puppy. Also, I prevailed upon a friend who just
happens to be a world-class welder to weld up the broken radiator
castings and repair a minor crack in one hub. Details
and Pictures
The Rest of the Story
What it cost (updated 10/98)
Where I got stuff
F12/F14 Parts for Sale